


Longing for the rich, spicy taste of Adana Kebabı but lack an outdoor charcoal grill? Fear not, ambitious home chef! Recreating the essence of this iconic Turkish dish without the traditional open flame is entirely achievable with the right techniques and a few clever adaptations. This comprehensive, step-by-step guide is meticulously crafted for those seeking to master Adana Kebabı in a conventional oven or on an electric grill. We will demystify how to maintain that crucial juiciness, develop a flavorful sear, and capture as much of the authentic experience as possible, all within the comfort of your kitchen. Prepare to transform your indoor cooking setup into a surprising arena for kebab perfection, proving that true Adana Kebabı flavor is within reach, no matter your equipment.
Mastering Adana Kebabı Without a Charcoal Grill: Is it Possible?
Yes, it is absolutely possible to make delicious Adana Kebabı at home without a charcoal grill, although achieving the exact smoky flavor will be a challenge. The key is to understand the fundamental principles of cooking Adana Kebabı – high heat, even cooking, and moisture retention – and adapt them to indoor methods like oven broiling or electric grilling.
The Challenge: Replicating Charcoal Flavor and Texture Indoors
Replicating the unique char, smoky aroma, and tender-crisp texture of charcoal-grilled Adana Kebabı indoors presents specific challenges.
- Smoky Flavor: The distinctive smoky taste comes from fat dripping onto hot coals and vaporizing, infusing the meat. This is nearly impossible to reproduce perfectly indoors.
- Intense, Direct Heat: Charcoal provides very high, direct radiant heat that quickly sears the outside of the kebab, creating a flavorful crust while keeping the inside juicy. Indoor appliances can mimic high heat but often lack the same intensity.
- Even Browning: The continuous turning on a grill ensures all sides are equally exposed to heat, resulting in uniform browning and charring.
The Goal: Juicy Inside, Crispy Outside, Minus the Smoke
While the smoky flavor might be elusive, the primary goal for indoor Adana Kebabı is to achieve a juicy interior with a nicely browned, slightly crispy exterior.
- High Heat: Utilize the highest possible heat setting on your oven or electric grill to create a good sear quickly.
- Moisture Retention: Focus on techniques that lock in the meat’s moisture, preventing it from drying out. This includes proper mince preparation and frequent turning.
- Surface Browning: Aim for a rich, dark brown crust through the Maillard reaction, which develops complex flavors.
Oven Method: Broiling Your Way to Authentic Kebab
Broiling in a conventional oven is an excellent method for cooking Adana Kebabı indoors, as it utilizes direct top-down heat similar to a grill, ensuring a good sear and juicy result. This method is efficient and provides consistent heat.
Essential Oven Setup and Preparation
Proper oven setup is crucial for maximizing heat and preventing mess when broiling Adana Kebabı.
- Preheat Oven to Max: Preheat your oven to its highest setting, typically 230-250°C (450-480°F). Engage the broiler (grill) function if your oven has one, as this provides intense direct heat from above.
- Rack Position: Place the oven rack in the upper third of the oven, allowing the skewers to be close to the heating element without touching it. This optimizes direct heat exposure for searing.
- Drip Pan: Line a baking sheet or oven-safe tray with heavy-duty aluminum foil for easy cleanup. Place a wire rack on top of the foil-lined tray. This setup allows fat to drip away, preventing the kebabs from sitting in their own grease and encouraging browning.
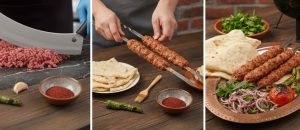
- Skewers: Ensure your Adana Kebabı mince is already shaped onto wide, flat metal skewers as prepared in our “How to Make Authentic Adana Kebabı at Home” guide.
Step-by-Step: Oven Broiling Adana Kebabı
Follow these steps carefully to achieve a juicy and well-seared Adana Kebabı in your oven.
- Place Skewers: Carefully place the skewered kebabs directly on the preheated wire rack. Ensure there is some space between each skewer for even air circulation.
- Initial Cook (First Side): Place the tray with kebabs in the preheated oven. Cook for 4-5 minutes until the top side starts to brown and sizzle.
- Turn and Continue: Using tongs, carefully turn the kebabs to expose a different side. Continue cooking for another 3-4 minutes per side, turning frequently to ensure even cooking and browning on all surfaces.
- Monitor Closely: Broiling is fast. Stay vigilant and do not leave the oven unattended, as kebabs can go from perfectly browned to burned very quickly.
- Check Doneness: The kebabs are done when they are nicely browned with some charred spots on all sides, feel firm but still yield slightly to pressure, and are cooked through but remain juicy. Total cooking time will typically be 12-18 minutes, depending on your oven and kebab thickness.
- Rest Briefly: Once cooked, remove the kebabs from the oven and let them rest for 2-3 minutes on a cutting board or platter before serving. This allows the juices to redistribute, resulting in a more succulent kebab.
Pro Tips for Oven Kebab Success
To elevate your oven-broiled Adana Kebabı and maximize flavor and texture, consider these expert tips.
- High Heat is Non-Negotiable: Don’t be afraid to use your oven’s highest heat setting. The goal is to cook quickly to prevent drying out.
- Preheat Thoroughly: A properly preheated oven and rack will ensure an immediate sear upon placing the kebabs.
- Use the Broiler: If your oven has a broiler, utilize it. It provides more direct, intense heat, closer to grilling.
- Don’t Overcrowd: Cook in batches if necessary to avoid overcrowding the rack. Overcrowding reduces air circulation and lowers the temperature, leading to steaming rather than browning.
- Monitor Fat Drips: While the foil-lined tray catches most fat, if excessive smoke occurs, you might need to briefly open the oven door or reduce heat slightly.
- Serve Immediately: Oven-cooked kebabs, like grilled ones, are best enjoyed hot off the heat.
Electric Grill Method: Bringing the Kebab Shop Home
An electric grill can be a convenient and effective tool for cooking Adana Kebabı indoors, offering direct heat that helps achieve a good sear and a juicy interior. While it won’t replicate the smoky flavor of charcoal, an electric grill allows for quick and relatively mess-free preparation, making authentic Adana Kebabı accessible to more home chefs.
Choosing the Right Electric Grill and Setup
Selecting the appropriate electric grill and setting it up correctly are key to maximizing its performance for kebab cooking.
- Type of Grill:
- Contact Grills (e.g., Panini Presses): Less ideal, as they press the meat, potentially squeezing out juices and flattening the kebab.
- Open-Plate Grills (e.g., George Foreman-style with adjustable top, or flat electric griddles): More suitable, allowing the kebabs to cook without being compressed. An electric griddle with high heat capability is particularly versatile.
- Indoor Smokeless Grills: These can offer a good compromise, providing grill marks and intense heat with minimal smoke.
- High Heat Capability: Ensure your electric grill can reach and maintain high temperatures (e.g., 200°C / 400°F or higher). High heat is crucial for searing and browning.
- Clean and Preheat: Always start with a clean grill surface. Preheat the electric grill thoroughly to its highest setting before placing any kebabs on it. A hot surface ensures immediate searing.
- Lightly Grease: Lightly brush the grill plates with a high-smoke-point oil (like vegetable or canola oil) to prevent sticking, even if your grill is non-stick.
Step-by-Step: Electric Grilling Adana Kebabı
Follow these steps for successful Adana Kebabı preparation on an electric grill, aiming for quick cooking and a good sear.
- Prepare Skewers: Ensure your Adana Kebabı mince is already shaped onto wide, flat metal skewers. If your grill is small, you might need to form slightly shorter or thicker kebabs, or opt for a single, larger piece of minced meat (like a small patty) that can be cut after cooking.
- Place on Grill: Carefully place the skewered kebabs directly onto the preheated electric grill. Do not overcrowd the grill; cook in batches if necessary to maintain consistent heat.
- Cook and Turn:
- Initial Searing: Cook for 2-3 minutes per side to get a good initial sear.
- Frequent Turning: Continue cooking for a total of 8-12 minutes, turning the kebabs every 2-3 minutes to ensure even cooking and browning. The aim is to achieve nice grill marks and a rich brown color.
- Monitor Doneness: The kebabs are cooked when they are nicely browned on all surfaces, feel firm but still yield slightly to pressure, and are cooked through but remain juicy. Total cooking time will vary based on grill heat and kebab thickness.
- Rest Briefly: Once cooked, remove the kebabs from the grill and let them rest for 2-3 minutes on a cutting board or platter before serving.
Maximizing Flavor on an Electric Grill
While charcoal provides unique smoky notes, you can still maximize flavor on an electric grill with these simple tricks.
- Quality Ingredients: Start with the best possible lamb and fresh red pul biber. Their inherent flavor is paramount.
- Proper Mince: Ensure your mince is prepared correctly (coarse, good fat ratio, well-rested) to retain juiciness.
- High Heat Searing: The intense heat from the electric grill is crucial for developing Maillard reaction flavors on the surface. Don’t be afraid to crank up the heat.
- Marinade Enhancement (Minimal): While traditional Adana Kebabı has a simple marinade, you can add a tiny amount of liquid smoke (1-2 drops for 1kg meat) to your mince during the mixing stage if you desperately miss the smoky flavor. Use very sparingly as it can easily overpower.
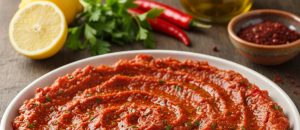
- Serve with Traditional Sides: The fresh, tangy, and spicy accompaniments like ezme and piyaz are vital for completing the flavor profile and providing contrast.
Common Pitfalls and Troubleshooting for Indoor Kebab
Indoor kebab cooking comes with its own set of challenges. Knowing how to identify and address common pitfalls will help home chefs achieve successful and delicious results. The main concerns typically revolve around preventing dryness and achieving appealing browning without a charcoal flame.
Preventing Dry Kebabs: Moisture Retention Strategies
The biggest risk with indoor kebab cooking is ending up with dry meat. Proper preparation and cooking techniques are essential for moisture retention.
- Correct Fat Ratio: Ensure your mince has the 20-30% lamb tail fat content. This fat renders during cooking, keeping the kebab moist. Do not trim all the fat.
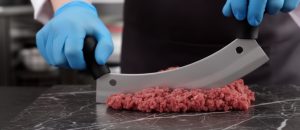
- Coarsely Minced Meat: As detailed in our “How to Make Authentic Adana Kebabı at Home” guide, do not over-mince or over-knead the meat. A coarsely chopped texture (like zırh kıyması) retains juices better than a fine, pasty mince.
- High Heat, Quick Cook: Cook your kebabs at high temperatures for a shorter duration. This sears the exterior quickly, creating a crust that locks in moisture before the interior dries out. Slow cooking at low temperatures will lead to dry kebabs.
- Frequent Turning: Whether in the oven or on an electric grill, turn the kebabs frequently. This ensures even heat distribution, preventing one side from overcooking and drying out while the other remains undercooked.
- Resting After Cooking: Always rest the cooked kebabs for 2-3 minutes after removing them from the heat. This allows the internal juices to redistribute throughout the meat, resulting in a more succulent kebab.
Achieving That Desired Char and Sear
Without the intense, direct heat of charcoal, achieving a desirable char and sear indoors requires specific strategies.
- Maximum Heat: Always preheat your oven to its highest broil setting or your electric grill to its maximum temperature. The higher the initial heat, the better the sear you’ll get.
- Close Proximity (Oven): When broiling in an oven, ensure your kebabs are positioned on the rack close to the heating element (upper third of the oven). This maximizes direct radiant heat.
- Clean and Hot Grill Grates (Electric Grill): For an electric grill, make sure the grates are meticulously clean and thoroughly preheated. Any debris can prevent direct contact and reduce searing.
- Light Oil Brush: A very light brushing of high-smoke-point oil on the kebab surface before cooking can aid in browning.
- Avoid Overcrowding: Give your kebabs space on the cooking surface. Overcrowding lowers the surface temperature and leads to steaming rather than searing. Cook in batches if necessary.
- Patience and Observation: Achieving the perfect char requires observation. Look for deep golden-brown colors with some darker, crispy spots. Don’t pull them off prematurely if they haven’t developed this crust.
Essential Preparation Before Indoor Cooking
The success of indoor Adana Kebabı hinges significantly on the preparatory steps taken before the cooking process begins. This includes ensuring the mince has the right consistency and is properly skewered, as well as maintaining the delicate balance of spices that define Adana Kebabı’s flavor profile. These foundational steps, even more crucial when adapting to alternative cooking methods, will ensure your kebabs hold their shape, cook evenly, and deliver authentic taste.
Mince Consistency and Skewering (Reiteration for Indoor Success)
The consistency of your kebab mince and the way it’s secured to the skewer are paramount, especially when cooking indoors where the heat dynamics differ from a charcoal grill.
- Correct Mince Texture is Key: As emphasized in our “How to Make Authentic Adana Kebabı at Home” guide, the mince must be coarsely chopped (either by hand with sharp knives or a single pass through a coarse grinder die). A finely ground or overly kneaded mince will become pasty, lose its juices more easily, and struggle to adhere to skewers under indoor heat. It will also lack the traditional bite.
- Optimal Fat Ratio: Maintain the 20-30% lamb tail fat ratio. This fat provides essential moisture and acts as a natural binder, which is even more critical when cooking without the forgiving environment of radiant charcoal heat.
- Firm Skewering: Ensure the meat is pressed very firmly and evenly onto wide, flat metal skewers. The distinct “kıymık” (finger indentations) are not just for aesthetics; they help secure the meat and aid in even cooking. For indoor methods, where you might not have the same immediate “grip” from charcoal, firm skewering is vital to prevent the meat from sagging or falling off.
- Chilling After Skewering: After skewering, it is highly recommended to chill the kebabs in the refrigerator for at least 15-30 minutes. This allows the meat to firm up and further bind to the skewers, reducing the risk of them losing shape or falling apart during cooking.
Spice Balance for Indoor Flavors
The simple spice balance of Adana Kebabı—primarily red pul biber and salt—is particularly important when cooking indoors, as the absence of charcoal smoke means the meat’s natural flavors are more prominent.
- Embrace Simplicity: Stick to the traditional spices: red pul biber and salt. Avoid adding garlic, onion, cumin, or other spices that are not authentic to Adana Kebabı. The lack of smoky notes means these extra flavors would be even more noticeable and detract from authenticity.
- Quality Pul Biber: Invest in high-quality, flavorful red pul biber. Since there’s no smoke to add complexity, the quality of your pepper flakes (for both heat and flavor) becomes even more critical.
- Salt Proportion: Ensure the salt content is correct (around 20-30g per kg of meat). Salt not only seasons but helps in developing the meat’s internal structure for moisture retention.
- Taste Test (Raw Mince): While not for consumption, gently frying a tiny piece of your raw mince and tasting it can help you adjust the spice levels before skewering the entire batch, especially if you’re unsure about the heat of your pul biber.
Your Indoor Path to Adana Kebabı Perfection
Mastering Adana Kebabı in your home kitchen, whether using an oven or an electric grill, is a testament to culinary adaptability and a celebration of authentic flavors. This guide has equipped you with specialized techniques and crucial insights, from optimizing your indoor setup and navigating distinct cooking methods to troubleshooting common challenges and perfecting your preparation. While the elusive kiss of charcoal smoke may be reserved for outdoor grilling, by focusing on proper mince consistency, meticulous skewering, precise heat management, and the traditional spice balance, you can consistently achieve a juicy, flavorful, and incredibly satisfying Adana Kebabı. Embrace these indoor methods as a pathway to culinary excellence, allowing you to bring the heart of Turkish gastronomy to your table any time. Your journey to indoor Adana Kebabı perfection is now well-charted – enjoy the delicious fruits of your efforts!


